
DIY Mini First Aid Kit Guide for Safety
by Ryan W ·
This page may contain affiliate links. For more information, see our "About Us" page.
DIY Mini First Aid Kit Guide for Personal Safety
The great outdoors presents many wonderful opportunities for exhilarating and fulfilling activities with friends and family. From fishing and hiking, to rock climbing and camping, mother Earth provides endless hours of entertainment. With that said, you should never take nature lightly. When you’re out and about on your excursion of choice, professional medical care can be hours away. Having a well-stocked first aid kit at your disposal can keep minor cuts and lacerations from becoming infected and turning into life threatening problems. These items can easily be packed into a small and compacted DIY mini first aid kit to ensure you’re ready for anything.
What should be in a backpacking first aid kit? A DIY Mini First Aid Kit should include:
- First Aid Manual
- Antiseptic Wipes
- Gauze
- Adhesive Tape
- Splint
- Hydrocortisone Cream
- Antibacterial Soap
- Adhesive Bandages
- Aspirin
- Instant Cold Packs
- Hydrogen Peroxide
- Antibiotic Ointment
- Oral Thermometer
- Non-Latex Gloves
- Antacid
- Water Purification Tablets
- Calamine Lotion
- Emergency Blanket
- Flashlight with Extra Batteries
- Elastic Bandages
- Tweezers
- Isopropyl Alcohol
- Diarrhea Medication
- Diphenhydramine (Benadryl)
- Scissors
- Safety Pins
- Sunscreen
- Knife (preferably Swiss Army or Multitool)
Travel preparations should not be taken lightly, especially when it comes to your backpacking first aid kit. First aid kits are akin to an endless void, as there will always be something else you could add, but space and carry weight must be taken into consideration. If your trip calls for an ultralight packing concept, then the above list may not fit into a condensed kit. Under ideal circumstances, each of these would make it into your backpack, preparing you for as many situations as possible.
What Is The Best First Aid Carrying Case?
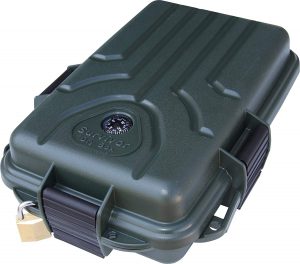
If you’re preparing a “do it yourself” first aid kit, you’ll need to purchase a proper carrying case/bag for your supplies. One of the first things you should be looking for is something waterproof. Even the smallest of leaks inside your first aid kit could ruin many of your supplies, providing a breeding ground for bacteria. An often overlooked solution is what is referred to as a dry box. This Survivor Dry Box with O-Ring Seal by MTM is an extremely compact solution (9.75”x7.75”x2.8”), easily fitting into your backpack of choice. Not to mention, coming in at less than $12, it fits the needs of almost every budget. Features of note include the ability to use a lanyard or shoulder strap, included padlock tab, and built-in signaling mirror and compass. Backpackers love multipurpose, and this thing fits the bill perfectly.
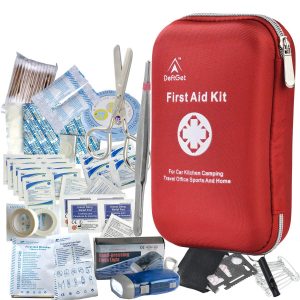
On the other hand, if you’re looking to go the premade route, this 163 Piece First Aid Kit by DeftGet comes with almost everything you could ever want. At just under $16, the DeftGet kit is FDA approved, and water resistant. Notice I didn’t say waterproof. You wouldn’t want to fully submerge this kit as it uses a zipper system, but as long as you have no plans of using it as a floatation device, it will resist rain and spills quite well. Not only that, but for just a few dollars more than the DIY version, you have a fully stocked first aid kit at your disposal.
How To Administer First Aid Treatment
It is important that you educated yourself on the proper use of the tools inside your backpacking first aid kit. As you can see, I’ve included a “First Aid Manual” in the #1 spot in this list for that very reason. Misusing first aid methods can inhibit their effectiveness, or even make the situation worse. You should take care in making sure each item is labeled for its intended use as well. Another important educational resource is the Red Cross, which has articles covering nearly every possible use case scenario imaginable, as well as directions, emergency procedures, and essential contacts.
If you’re traveling with others, make sure that your companions are also aware of how to administer first aid. There may be times when you aren’t nearby, or worse, and one of them needs to step up to the plate. Basic first aid skills are a necessary life skill, yet sadly with each passing generation it seems less and less understand even the simplest concepts.
For example, I was visiting a friend (a nurse) at the hospital last week when a crazed 20-something bolted through the doors to the ER demanding stitches. At first I thought nothing of it, until they explained how they were “scratched” by a tree limb. My friend went over to check them out, and saw nothing but a little 2 inch long red scratch with no blood in sight. Yes, this person was probably mowing their lawn, felt a slight burn, saw a little red mark, and went straight to the emergency room. Even after being looked at by my friend, they STILL insisted on seeing a doctor. Could you imagine racking up a huge ER bill for a tree limb scratch? With proper education, this person would have saved tons of time, money, and embarrassment. Which helps lead nicely into our next section…
When To Seek Help
If your situation goes far beyond that of basic first aid, know when to seek professional medical assistance. While the joys of nature are breathtaking, they aren’t worth risking your life, or the lives of others. If you find yourself in an emergency situation, find help as soon as possible. Having multiple ways to contact outside help should always be a part of your game plan. When you’re deep in the backcountry, cell phones aren’t always reliable. Two great options include Personal Locator Beacons (or PLB), and Satellite Emergency Notification Devices (or SENDs).
What Is A Personal Locator Beacon (PLB)?
A Personal Locator Beacon (PLB) is a small transmitting device that notifies emergency services of life threatening situations. PLBs broadcast at frequencies of 121.5MHz for Local Area, and 406MHz for long range. To use a Personal Locator Beacon, there is a three step process to avoid accidental alarm triggering. The PLB will then supply your GPS coordinates to emergency services to help aid them in locating you. The only downfall to these beacons is their inability to send anything other than an SOS along with your physical location.
When it comes to a quality Personal Locator Beacon, we highly recommend the Bouyant ACR ResQLink 400 PLB-400. Coming in at just under $300, it is a much cheaper alternative to SEND units, and while not as feature rich, it is more than capable of getting help when you need it most. Notable features include the 406 MHz distress / homing signal, and LED / infrared strobe lights. It touts global coverage and ACR has a proven track record with high quality, durable Personal Locator Beacons. It is waterproof at 16.4ft for up to 1 hour, and 33ft for around 10 minutes.
What Is A Satellite Emergency Notification Device (SEND)?
Functioning along the same concept as the Personal Locator Beacon, a Satellite Emergency Notification Device uses satellites to do their job, hence the name. However, unlike the PLB, the SEND has a few more tricks up its sleeve. Satellite Emergency Notification devices have the ability to transmit multiple types of preset messages, including but not limited to Send Help, SOS, and OK. Other notable features of a SEND include: Bluetooth, Weather Reporting, Navigation Assistance, and GPS tracking.
The only downfalls of Satellite Emergency Notification devices are that they require subscription and activation fees. This is due to the fact that SENDs use private satellite arrays. These fees average around $200 yearly and about $20 for activation. If you’re an avid outdoorsman, then this is a small price to pay for the added peace of mind knowing that help is always available.
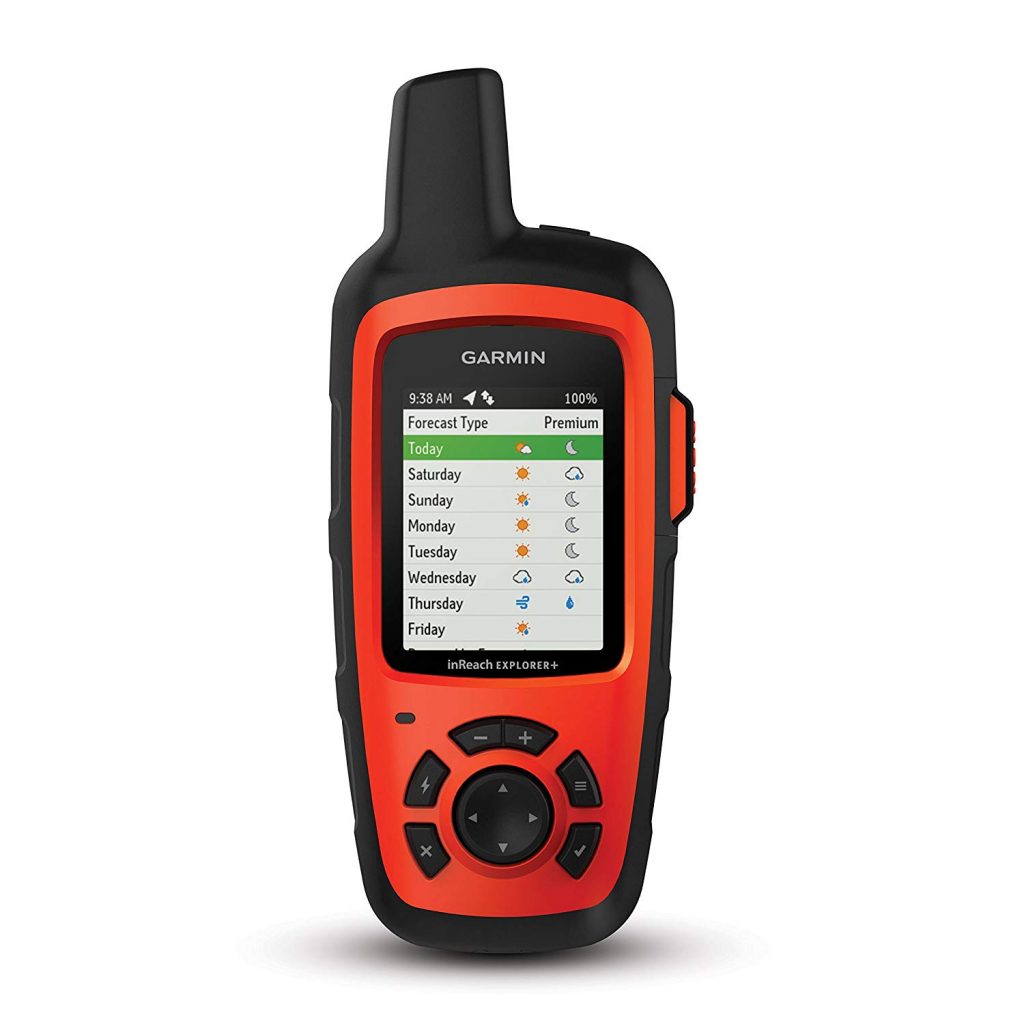
Our top choice for a Satellite Emergency Notification Device is the Garmin inReach Explorer+. Known for its 100% global Iridium satellite coverage, it allows two-way texting from any location. IPX7 construction means no worrying about water ruining your device, and a rechargeable lithium ion battery means no fussing around with replacements. The inReach Explorer+ can be paired with the Earthmate app via your mobile device to access maps, NOAA charts and graphs, and even aerial imagery. It also features a built-in digital compass, accelerometer, and barometric altimeter. The initial asking price of just north of $400 might feel a bit steep, but for a product made to last a lifetime, it’s a worthwhile investment.
DIY Mini First Aid Kit Guide - Conclusion
While we strongly encourage people of all ages to get out and enjoy the possibilities of outdoor living, doing so safely should always be in the back of your mind. A solid backpacking first aid kit that meets all your basic and non-life threatening medical needs is a mandatory inclusion. With this DIY Mini First Aid Kit Guide, hopefully you’ll be prepared when the unexpected happens. When that ceases to be enough, being able to reach out for help should then become priority. With the advent of Personal Locator Beacons and Satellite Emergency Notification Devices, there is no excuse to be caught without a connection to the outside world. If you play it safe, educate yourself, and properly prepare, you’ll be ready to enjoy a lifetime of your favorite outdoor pastime, worry free. If you’re looking for more backpacking information, check out our article “How To Keep Drinks Cold In A Backpack“.

